Aerial Yoga Rig Assembly Tutorial
This aerial yoga rig assembly video covers simple and easy steps to set up your height-adjustable rig. We’ll also go over commonly asked questions and answers during install and take-down of your aerial yoga stand.
About Our Aerial Yoga Rig Tutorial
Learn how to successfully assemble your Uplift Active height-adjustable rig so you can safely use your aerial silks, aerial yoga swing, aerial hammock, and more!
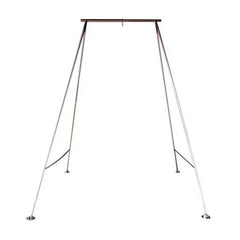
Our aerial rigs are an A-Frame style, made of stainless steel and magnesium alloy, with a maximum user weight limit of 310 lbs (140 kg). They are completely height-adjustable from 5 ft. -11 ft., meaning you can fit them in rooms with short ceilings when doing aerial exercises indoors or expand to the full height when outdoors.
Before you begin these aerial yoga rig instructions, please thoroughly review the manual to know what to expect. In the manual, you'll find the footprint guide that will tell you how much space you need on your floor at different heights.
Make sure you have nothing in the way that could cause a trip hazard or possibly get damaged during setup.
When you're ready, unpack all the hardware and parts from the packaging and review the list of parts in the manual to ensure you have everything. It helps if you have something to put down on the floor to store your parts to avoid scratching the floors, like a blanket, fabric, towel, or old yoga mat.
To assemble, start with your top bar. The top bar is the pole with no foot at either end. You will use this bar to attach your top bar connectors. Depending on how your rig is packaged, it may include the top bar connectors pre-installed, or you might need to slide them on. If you need to slide them on, use the push pins on either side to remove the leg connectors first.
The smaller end of the top bar connectors fit on the top bar. Add one or two depending on whether you're rigging a single point or double point.
Now add your leg connectors. The longer end fits onto the bar. Turn until the push pin locks in place to be secure. Next, assemble the legs. It’s easiest to do this step with a friend. Insert the legs into the leg connectors, starting with the ones on the bottom.
Ensure the feet of the rig are placed padded-side down on the ground and pin the legs in place. You may need to rotate or wiggle the legs to get the holes lined up.
You'll repeat this process with all four legs. When arriving from the manufacturer, the legs will have pins on the bottom. Keep those pins in place until the next step.
Next, lift the rig upright. Bend from the knees and lift with a friend if possible. From there, you can readjust and center the rig in your desired location.
Next, adjust and tighten your top bar connectors, and attach your apparatus.
Use the hex key to tighten in a clockwise direction.
Next, extend the legs, starting with the top layer. There are options here – if the ceiling is under eight feet, extend the middle and top layers together (completely overlapping). You can use a pin to align these two as a placeholder as you extend. Pin through all three layers at your desired height.
If you are extending 8 feet or above, you must first extend just the top layer. Pull down the middle layer to isolate just the top and middle layers. Pull slowly with control. You will need the middle layer slightly raised in order to align the middle and top layers together.
The top layer has three holes closer together for more fine-tuned height adjustments. Once you’ve lifted one layer, repeat for all four legs.
Next, lift the middle layer and connect the middle and bottom layers together at your desired height.
Repeat for all four legs. Do one side and then the other for the best stability. It is possible to do it alone, but you may need to lift the rig one leg at a time in smaller increments.
As you extend the legs, be mindful of the white caps. These are visual indicators that you’ve reached the end of a given layer. If you pull the leg layer beyond the white cap, the leg may become lodged or stuck in place or can even come apart. The legs are not designed to come apart.
Once all the legs are pinned in position, you will want to stabilize the rig by pulling the feet out to the sides. Increasing the footprint improves stability. Add the stabilizing straps to improve stability further.
The straps come in two pieces and can be connected by pressing down on the clip and inserting the long end of the strap through. The height is up to your preference, depending on how high you are flying.
Always add a crash pad when you hang for safety.
To disassemble, remove the pins one layer at a time. Hold onto the rig to guide it as the poles shift downwards.
The pieces disassemble and fit into two carrying bags. There’s a diagram in the manual showing how to insert these pieces into the bags.
Thanks for watching our aerial yoga rig assembly instructions video!
The Uplift Active team is always here to help answer any questions you have about product usage, set-up, or disassembly. Please contact us if you require assistance with the aerial rigging process.
If you want to purchase a height-adjustable portable aerial rig or other aerial equipment, including yoga swings, ceiling hooks, a daisy chain extender, a yoga hammock, or more, browse our extensive aerial yoga product collection.